It's Fall Y'all Wall Hanging DIY | Step By Step Kit Guide
- Shelbe Brooks
- Aug 30, 2025
- 2 min read


Looking for the perfect way to bring cozy autumn vibes into your home?
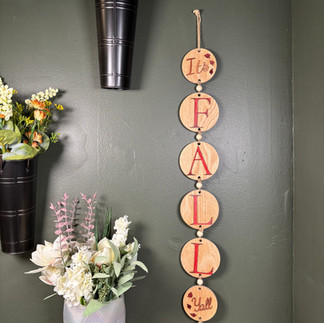
Our It’s Fall Y’all Wall Strand DIY Kit has everything you need to create a rustic, farmhouse-inspired fall decoration. Whether you’re a beginner crafter or a DIY pro, this kit makes it fun and simple to create a seasonal piece you’ll love hanging in your home.
What’s Included in the Kit:
• Paints & paintbrushes
• Mod Podge sealer
• Jute rope
• Laser-cut letters & leaves
• 5 wooden round backings
• Decorative beads

All you need is a little creativity (and maybe some scissors for trimming the rope).
Step 1: Paint the Cutouts
Start by painting your laser-cut letters and leaves. Choose fall-inspired colors like burnt orange, mustard yellow, deep red, or rustic brown. Let your imagination run wild, mix and match shades for a unique look.


Step 2: Seal & Attach

Once your paint is dry, seal the cutouts with Mod Podge to protect the finish. Then glue each one onto its wooden round backing. These will be the main pieces of your wall strand.
Step 3: Make a Tassel

This part is fun!
1. Cut a 6-inch piece of jute rope and lay it horizontally.
2. Take a longer piece and loop it vertically around your paintbrush or a thin piece of cardboard (about 6 inches long). You can make it larger or smaller depending on the tassel size you want.
3. Use a small piece of rope to tie off about an inch below the top, looping twice for extra hold.
4. Slide the tassel off the brush and trim the ends.
Step 4: Knot the First Round
Thread your jute rope through the top hole of your first wooden round and create a scaffold knot. This will be the anchor for your strand.
Step 5: Build the Strand

Now it’s time to stack your pieces:
1. Loop the jute rope through the top hole of your next wooden round.
2. Add a bead by threading both rope strands through it.
3. Bring the rope back through the bottom hole of the first wooden round and tie off.
Repeat this process with each wooden round until you’ve built your full wall strand.
Step 6: Finish the End

When you reach the last round:
1. Thread a bead through both rope ends.
2. Weave them through the bottom hole of the final wooden round.
3. Tie off securely and trim any excess rope.
Step 7: Display & Enjoy!
That’s it — your It’s Fall Y’all Wall Strand is ready to hang! Add it to your entryway, living room, or mantel for the perfect touch of farmhouse fall décor.


Every kit is unique to you, no two wall strands will look exactly alike. That’s the beauty of DIY! Snap a picture of your finished craft and share it with us by tagging @CrazyCraftCreations on social media. We can’t wait to see your cozy fall creations.
Ready to Craft Your Own?
Grab your It’s Fall Y’all Wall Strand DIY Kit today and bring a little handmade charm into your home this season.


Comments